
Entice a variety of owls to nest around your homestead using these simple DIY owl box plans.
I first stumbled into making owl boxes through a request from a local nursery here in Sonoma County, California. I was happy to jump at the chance to help, and now I’ve made upwards of 70 owl dwellings — nearly an entire avian subdivision.
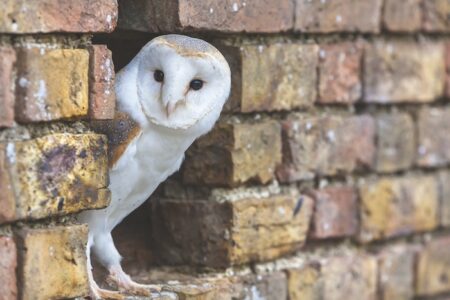
Expert birders and random observers alike are fascinated by owls, part bird of prey, part ghost in the night. It continues to be a rare delight when I spot one gliding silently on its evening hunt. They’re excellent at controlling pest populations in fields and vineyards. Their menu is anything small and furry, including mice, shrews, voles, and gophers, and you can see their hunting success firsthand in the regurgitated pellets scattered below their dwellings. Tiny white bones dot the grass below their enclaves. Beyond fulfilling their duty as pest exterminators, though, owls are alluring creatures to host on your property.
An owl box, in which an owl can nest protected from predators, is simple in design and execution. Alongside a handful of other subtle details, it’s really just a rectangular box that will attract many species, from barn and barred owls to short-eared and great horned owls. I make my boxes out of sanded exterior plywood. You can buy a finely sanded 3/4-inch sheet for around $40, but I’ve learned that the thinner 15/32-inch sheet, while a grade lower in quality, works well for both my wallet and the weight of the box. Keep in mind that you’ll have to hoist this thing onto a mounting pole, into the crotch of a tree, or onto the edge of a barn.
You can make two owl boxes with one 4×8 sheet of plywood. Even if you’re only making a single box, I recommend buying a full 4×8 sheet; you might as well have some left over for another project. Most home improvement stores have a panel saw and a plucky employee in the lumber department who will cut the plywood for you. Ask them to cut the sheet into thirds, 48 by 32 inches apiece. This will help you more easily maneuver the sheets into your vehicle.
Once you’re back at your shop, follow these easy steps for cutting and assembly. Every time I begin another project, the plywood going through the table saw produces a pine fragrance I’d wear as cologne if bottled. I’d call this one Eau de Owl Box.
Tools
- Saw, table or circular
- Jigsaw
- Sander or sanding block
- Sandpaper
- Finish nailer or hammer
- Drill
- 3/8 inch Forstner bit or twist bit
- Palm router or chisel
- Tape measure
- Pencil
- Oscillating spindle sander, optional
- Router or router table and round-over bit, optional
Materials
- 4×8 sheet of 15/32-inch plywood
- 1-1/2-inch nails (40)
- 1-1/2-inch square bend screw hooks (4)
- 1-1/2-inch hinges (4)
- Wood glue
- 1/4-inch screws (16)

DIY Owl Box Plans
1. Cut the pieces. Start by ripping each of your three pieces of plywood in half, so you have six sheets, 48 by 16 inches each. I use a table saw to do this, but you can also use a handheld circular saw. You’ll crosscut each side of the box out of these smaller sheets.
Next, cut the box’s front and back. These two identical pieces should be rectangles, each measuring 22-by-15-1/2 inches. Then, cut a 21-1/2-by-10-1/2-inch rectangle for the bottom board.
My design calls for a larger top board that overhangs the front and back of the box to deflect rainwater (see Photo 1), so cut the top board to 22-1/2 by 13 inches. The left board will fit inside the front and back boards, with the edge concealed for a clean look. Cut it to 10-1/2 by 15-1/2 inches. The right board is 1 inch wider and, unlike the left board, will show its edges. Cut it to 11-1/2 by 15-1/2 inches.

Once you have all the individual boards cut, it’s time to cut the top and right boards to create hinged clean-out doors. These will make field inspections easier without having to hoist the box up and down. Measure 7 inches in from one short side of the top board, and then cut across. On the right board, measure 4 inches from the bottom, and cut across. Now you have two doors that will be reattached with hinges later (see Photos 2 and 3).
To make it easy to unlock the clean-out doors during use, and also to keep a wayward raccoon from prying open a door and scooping up an owlet, your next step is to notch out spaces for the square bend screw hooks that you’ll install in Step 6. Study Photo 2 for the notch locations. On both the top board’s largest piece and the right board’s smallest piece, measure and mark the notch locations about 2-1/2 inches in from the outer corners. Cut the notches using a table saw, as I do, or a handheld saw. The notches should measure approximately 3/8 inch wide by 3/8 inch deep to accommodate the square bend screw hooks.
You’ll have a few pieces of scrap wood left over. Rip one piece to about 4 by 10 inches for a divider that will separate the inside of the box into two rooms. This divider will keep raccoon claws from reaching into the box and pulling out a hatchling.

2. Rout top piece (optional). To make the owl box look and feel more finished, put the top board through a round-over bit on a router table; you can also use a sander or sanding block. This small detail gives the roof, including the clean-out door, a gentler presentation.
3. Drill air holes. Adding three holes to the front’s upper right corner will allow air to flow in and out of the box. I drill air holes with a 3/8-inch Forstner bit on a drill press, but you can use a 3/8-inch or 1/2-inch twist bit on a cordless drill. Don’t be fussy about the size. I line the three up horizontally on the right side of the front board (see Photo 1).
4. Cut the opening. The opening — the owl’s front door — is an ellipse. The ellipse creates further protection from predators; it’s more difficult for a raccoon to contort its body through an ellipse.
Pick up the front board and roughly draw an ellipse 5 inches down from the top and 3 inches in from the left side. It should measure 4-1/2 inches wide by 3-3/4 inches high (see Photo 1). Birders have told me that the hole needs to be fairly exact in height and width, but it’s OK if the shape of your ellipse is a bit rough. Drill a pilot hole to fit the jigsaw blade, and then cut out the ellipse. Smooth the edges of the cut with an oscillating spindle sander, if you have one, or sand it by hand.
5. Create talon grips. Grooves beneath the entrance hole will provide a place for owls to grip when they land, as well as an indentation for them to perch on. A protruding perch, as is often seen on a birdhouse, would give that prowling raccoon a convenient place to wait for his meal.
To create a set of talon grips, draw the first groove 1 inch or so below the ellipse at 4-1/2 inches wide — the same width as the hole. Space two more grooves below the first, 1 inch or so apart (see Photo 1).
Although these grooves can be pretty rough, this is another opportunity to showcase craftsmanship. I drill a pilot hole about 1/4-inch deep, grab the router and a 1/4-inch straight bit, lock down a fence, and fire through the three grooves. You can use a palm router or a chisel. The owls won’t notice the difference.
6. Assemble. Second only to the action on the table saw, assembly is the most satisfying part of building this owl domicile. Arrange your boards, grab your glue and nail gun, and prepare for an owl barn raising. (A note on the nail gun: If you’ve got a finish nailer, great. If not, you can do it the old-fashioned way with a wood-handled hammer. It’ll just take a bit longer.)
Start with the front and bottom boards. Line up the edges at a right angle, with the front overlapping the bottom board, and fire four or five nails across the bottom. Remember, you’ll be concealing the left board’s edge, so there’ll be a 1/2-inch overhang on that side.
Fit in the left board, glue, and nail. Flip the assembled pieces over onto the front board, and then glue and nail the back board into place.

Remember: You cut the top and right boards into two pieces to create clean-out doors. After the large upper piece of the right board and the small left piece of the top board have been nailed into place, it’s time to reattach the loose doors using hinges. Screw in the hinges to connect the two pieces of the right board, and then do the same with the two pieces of the top board (see Photos 2 and 3).
Mark the locations of the notches, and pre-drill holes into the thickness of the corresponding boards for the square bend screw hooks. Tighten the screw hooks until snug. They should be fairly easy to twist when you’re out in the field.
Run glue along two perpendicular edges of the scrap divider you ripped earlier, and place it upright on the inside of the box, a couple of inches to the right of the opening hole (see Photo 4).

Let the box dry, give it a light sanding, and, voilà, you’re the Frank Lloyd Wright of ornithological architecture.
Proper hanging of your complete owl box is all about location, location, location. It should be placed high and inviting for your owls, such as up in the crook of an oak tree or the rafters of a barn. Sometimes installing it at the top of a pole in a field is best, but I like mine to blend in with the landscape. The owls will find it, and they’ll be most appreciative.
More bird-related DIY projects:
Sean Stiny is a writer and woodworker in Sonoma County, California. Find more of his projects at Long Road Woodworking.


